
Integrating a Static Library Into a Swift Package (part II)
This is the second part of a series on modernizing library packaging. Make sure to check out part 1 of this series first, where we explored the evolution of .a libraries, frameworks, and XCFrameworks.
When working on iOS projects, integrating static libraries (C/Objective-C) into Swift Packages can seem daunting.
But with tools like Swift Package Manager (SPM) and XCFrameworks, integrating these libraries has become significantly easier and more efficient.
This step-by-step guide will walk you through the entire process, from inspecting the static library to packaging it into a reusable Swift Package.

Why Modern Packaging Matters
Static libraries have long been a staple of iOS development, but they come with challenges like manual header path management and lack of platform compatibility.
Combining XCFrameworks and SPM and you can future-proof these libraries, making distribution and integration seamless. This approach is essential for efficient modular development, compatibility with new architectures like Apple Silicon, and streamlined team collaboration.
Prerequisites
Before we jump in, be sure you have the following:
A static library (.a file).
The corresponding public header files (.h).
A Swift package to house the static library.
You’ll also need basic familiarity with terminal commands and Xcode.
Step 1: Inspect the Static Library
The first step is to inspect your static library to determine its supported architectures. This is important because XCFrameworks require architecture slices to be separated by platform.
Run one of following commands to inspect the library:


You’ll get an output like this:

This indicates the static library is a "fat binary" containing slices for multiple architectures: armv7, i386, x86_64 and arm64. To create a valid XCFramework, we’ll need to separate these slices to ensure platform compatibility.
Why This Matters
Since we are creating an .xcframework, we must keep the architecture slices clearly separated by platform. You cannot pass a fet .a with overlapping architectures into the .xcframework builder.
Step 2: Prepare the Folder Structure
A clear folder structure is necessary for organizing the .a slices, public headers, and modules. Here’s how to set it up:
a. Create the Root Folder
Make an empty folder for your project. Inside, create two subfolders:
- build: This will hold the architecture-specific slices.
- include: This will store public headers.
b. Add Architecture-Specific Subfolders
Within the build folder, create subfolders for each platform architecture you’ll support. For example:
- build/ios-device (for arm64)
- build/simulator-arm64
- build/simulator-x86_64

c. Add Public Headers
Copy all header files (.h) into the include directory.
d. Create a Modules Directory
Inside the include folder, create a Modules folder to house the module.modulemap file. Your folder structure should now look like this:

Step 3: Making the modulemap
The module map tells Swift how to import the static library. Inside the Modules folder, create the module.modulemap file with the following content:

Notes:
If you have an umbrella header that consolidates all public headers, use that in the
headerfield.For non-umbrella setups, list all headers individually:

Step 4: Slicing the Library
Depending on how your .a file was built (see step 1), you might be dealing with either:
A fat static library that supports multiple architectures (e.g., arm64, x86_64)
A thin static library that only contains a single architecture (e.g., arm64 only)
Both cases require special handling when preparing for .xcframework creation.
a. Fat static library
Let’s say that you want to create an arm64 slice for real ios device and a x86_64 slice for intel based Mac simulators. For that you would run the following command:
lipo -extract arm64 <path_to_a_library>/YourLibrary.a -output
<path_to_folder>build/ios-devices/YourLibrary.a
To create a slice for arm64 architecture for real devices in the specific sub-directory of the build directory you created at step 2.
lipo -extract x86_64 <path_to_a_library>/YourLibrary.a -output
<path_to_folder>build/simulator-x86_64/YourLibrary.a
To create a slice for x86_64 architecture for the simulators.
b. Thin static library
If your lipo-info results look like this:
Non-fat file: libMyLibrary.a is architecture: arm64
That means your library already contains a single architecture. In this case, no slicing is needed. You can just place the .a file directly in the corresponding folder for its platform.
Step 5: Create the XCFramework
Now that you’ve organized the architecture slices and public headers, it’s time to bundle everything into an XCFramework using xcodebuild.
Run the following command:
xcodebuild -create-xcframework \
  -library build/ios-device/libYourLibrary.a -headers include \
  -library build/simulator-x86_64/libYourLibrary.a -headers include \
  -library build/simulator-arm64/libYourLibrary.a -headers include \
  -output YourLibrary.xcframework
This will generate a folder named YourLibrary.xcframework, containing platform-specific slices and headers.
Step 6: Adding the XCFramework to the Swift Package
Now that you have your .xcframework, the final step is to wrap it in a Swift package. Using Swift Package Manager (SPM) makes the library easy to import and reuse across projects with a single dependency line, eliminating the need for manual linking or configuring search paths.
a. Create a New Swift Package
Use the terminal to create a Swift package:
mkdir YourLibraryPackage
cd YourLibraryPackage
swift package init --type library
b. Add the XCFramework
Copy the YourLibrary.xcframework folder into the package directory.
YourLibraryPackage/
├── Package.swift
├── Sources/
│   └── YourLibraryWrapper/
│       └── (optional Swift/Obj-C wrapper code)
└── YourLibrary.xcframework/
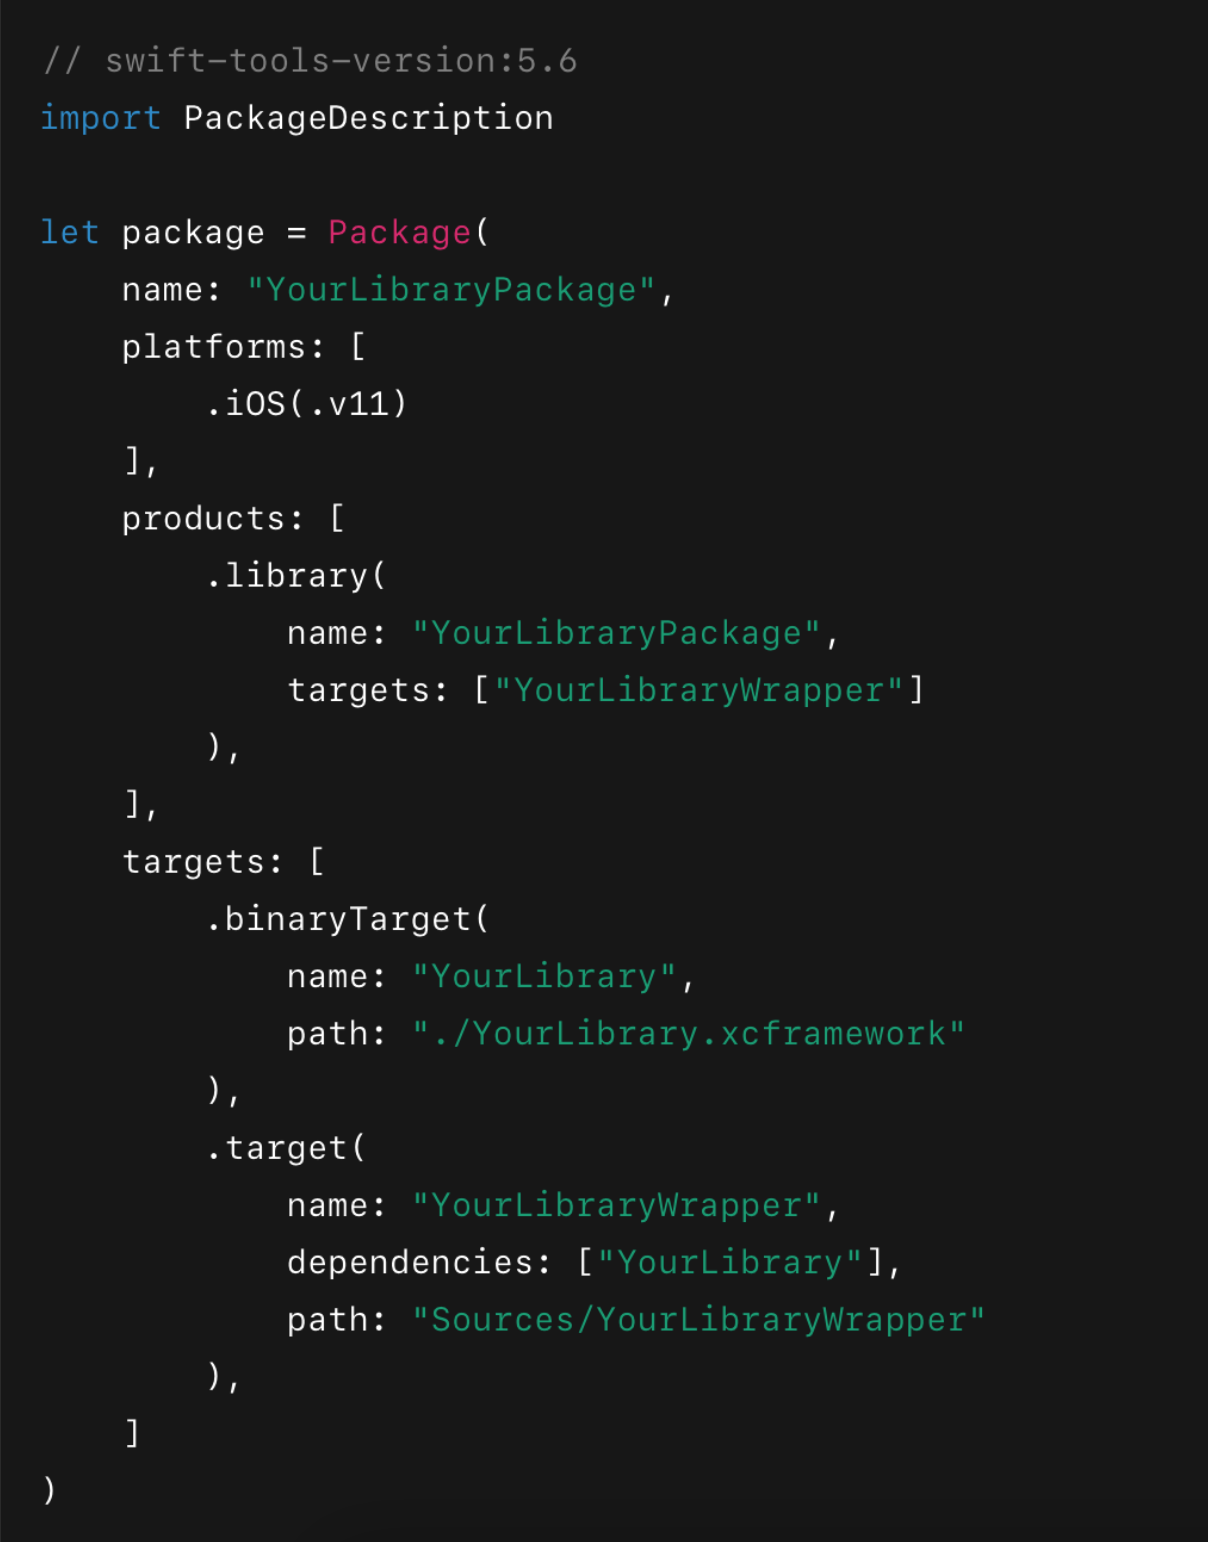
c. Update the Package.swift File
Edit the Package.swift file to include your XCFramework as a binary target:
Simplify Your Workflow With Modern Tools
Congrats! You’ve just transformed a static library into a reusable, future-proof Swift Package wrapped in an XCFramework by following these steps.
This approach ensures compatibility across platforms and architectures while taking full advantage of Swift Package Manager’s powerful features.
Have questions about this process or implementation challenges? Share your thoughts in the comments or reach out for tailored guidance. Together, we can optimize your development workflow and take your iOS projects to the next level.